Showing posts with label stripping paint. Show all posts

Sunday, January 31, 2010

A Newel Post


Get it? A newel post? Ha. 


I will be honest.  The hall is not done, and I started a new project.  Why? Well, it turns out, trim installation is a lot harder than it looks. In the twenty minutes I attempted it on Friday night, I cracked two boards and a wall.  Ouch.  Lucky for me, Kevin is a much more patient person, he is more methodical, and he doesn't mind finishing my abandoned projects.  We tend to compliment each other well when working on the house. He is really our detail man, whereas I am the blunt force.  I am good at removal and power-tooling; he is good at finishing and picking paint out of cracks.  He is good at power-tooling too, but only after I've destroyed something enough that he is over the fear of wrecking it. Without me, projects would take months to get started.  Without him, they would never get finished.  


More on the trim, installations and decisions in another post.

Anyway, we need to get the trim installed today because the furnace is finally going in on Wednesday, and we can't have stuff everywhere in the basement.  So Kevin is installing the trim, while I begin the hall stairs. There are five stairs from the main floor, then a landing in which you make a 180 degree turn, then go up the rest of the way.  I am focusing on the stairs on the main floor, and leaving the top half until we are working upstairs again. Kevin and I are getting sick of feeling like we live in a crackhouse whenever we have guests, so main floor first. 


Here is a before shot, taken on the day we bought the house.  You can just barely see the carpet on the stairs...mmm minty green goodness.

Here is What we did to the stairs on the day we closed on the house:


Why is it that new homeowners always feel the need to rip out carpet the first day?  It's like a hazing ritual from the house. 


Anyway, here are the stairs about midway through the day yesterday. 


I took off the trim around the newel post and I am planning on trying stripper on it, as they are small pieces and I don't want to sand them too much.  Our stairs have this glossy yellowish finish from the 50's.  Here is a close-up.  

Anyone know what this is? You can see the grain through it, so it's not paint. We know it was put on circa 50's because the crappy built-ins in the dining room also date to the 50's and the finish is on them too.  It reminds me of a glaze.  


I would love to hear from you all: 


What was your first project after the keys of your house were handed to you?  

Saturday, January 16, 2010

Step Four: Sanding

This is the fourth part of my series about stripping woodwork.  This is the step we really didn't want to do, but since the stain originally put on our wood work became blotchy when we took off the old shellac, we had no choice -- we had to sand.  It really did slow the process down.  Any regular readers might recall I was planning on doing the entire main floor this winter.  I am still in the hall I started in.  So it goes; we didn't really think I was going to have such high productivity did we?


Anyway, on to the sanding.  Any area that could be power sanded, got treatment from the random orbital.  While doing the outdoor project, we invested in a hose attachment and connectors so we could hook up the  shop-vac and the sander.  It really cuts down on the dust produced by the sander. We got the hose attachments at the Orange Store.

For sanding the trim, we went with four grits: 60, 100, 150, and 220. During the finishing phase we are using 400 to sand between coats.  Looking at the boards that are done, there are a few things I would have done differently.  I have a few of those curly scratches from the random orbital sander, and I think from now on, I will check the boards more carefully and hand-sand any of those out.  I will also work in a more well-lit area of the basement so I can see them better.

The trickiest part of sanding for me is when I am hand-sanding.  The boards that must be hand-sanded are the ones with the curves and detail.  It's hard to make sure I am keeping the profile crisp. I use a combination of hard sanding blocks and those soft foam sanding blocks that you see by the sanding paper at the store.  When I feel like the block itself is losing its grit, I just wrap new sandpaper on top.  I use the foam for any curves and the harder sanding block for corners and hard edges.

Once I was done sanding the boards I removed, I also began sanding the boards that remained installed.  These are the door frames. I found something kind of interesting when doing this.  The round doorway has a stop installed, like it used to have a door.  There are no ghosts of hinges, however, so I think the stop is just decoration.  Anyway, we thought removing the stop would make sanding a lot easier, so I began to pry it away.   The stops on our windows is mounted flush to the frame. On the round doorway, however, there is a channel cut into the frame. The joinery is so tight that the wood underneath hasn't even aged.

This picture above shows the straight piece of the stop removed, and the rounded still installed. I don't dare try to take it off the rounded area. I have a theory that the stop must have been installed before the frame was put in; all of the nails are sticking point side out.  Incidentally, it is a good thing there are no small children running around this house, because there has been at least 20 nails sticking straight out of the doorway for a week.

This picture gives you a good idea of what the wood looks like sanded down with 60 grit.  I make a point not to sand it down to make it look like perfect, new wood.  If there is a scratch, I don't sand it all out.  Although there is still some blotching I will sand out in future passes.


When working on the frames, I went to strip the paint on the kitchen doorway, and discovered it had always been painted.  I had mentioned what wood that was originally painted would look like when stripped. This is a good picture of it; see how underneath the paint it looks almost whitewashed?  It also shows the paint color we decided on for the hallway (the green on the left). I plan to strip this doorway and repaint it to match the kitchen woodwork.


And what has Kevin been up to while I have been working on the hall?


Making himself a woodworking bench.  It is his pride and joy; the top is individually laminated solid pine, when finished comes out to about 4 inches thick. The legs are also laminated together, all of it was hand-planed down smooth, and all of the mortises are hand-chiseled.  He really is a pretty talented guy.

And finally, a sneak preview of the finished boards. Next, I will report on the finishing and installation.


Monday, January 4, 2010

Step Three: Getting rid of the old shellac

So when we last left off, the board looked like this:
The next step is to get it looking more like the right side of this board:

Removing the old shellac is pretty simple, though a little messy. If you're lucky, you can go right from removal to finishing your boards, which was our plan... that fell through. More on that in a minute.

Anyway, tools you need are:
1. Denatured Alcohol, the solvent for shellac.
For more information on shellac, check out this Wikipedia Article.
2. Rubber or latex gloves.
3. Steel Wool or Synthetic Steel Wool
4. A bowl (doesn't matter the size, though it might be nice if it had a tight lid).
5. A rag (any rag).

Get your gloves on. Pour some alcohol into the bowl and dip the steel wool in. I bought synthetic steel wool for the first time on this project, and I must say, I like it a lot better than the real thing. For one, I don't have to worry about metal shavings ending up in my wood. Also, I don't like the feel of it. Though I can touch it unlike my mother-in-law who wouldn't even stock it at the hardware store she used to work at. I don't think she or I are alone in our distaste for steel wool.

Anyway, back to the process after a lengthy diversion.

Begin scrubbing the wood with the steel wool dipped in alcohol. When the alcohol gets too cloudy, pour some new stuff in your bowl. When the boards start to take on a dull appearance, the shellac is off.

Now, this is where we were going to go ahead and refinish. What we didn't count on was a stain below the shellac. This stain, while removing the old shellac, became blotchy. After reading about fixes for blotchy stain and trying talk ourselves into liking the look, we gave up and decided to sand all of the boards down to get rid of the blotchy stain.

So, stay tuned for sanding and finishing!

Thursday, June 4, 2009

School's out for the summer....

Okay, really I have three more days, but I can dream, right?  We took a short break in house project spending to blow some money on a new computer, as the one we had (with the Obama sticker) refused to charge properly anymore.  Here they sit while we are busy working on the house on Saturday, happily transferring data.  I have to say one thing about Apple, and then I will start writing about the house, I promise.  The process of switching to a new computer was effortless.  They hung out in the living room all day, and at the end, it was like using a newer, shinier, hipper version of my old computer.  Everything was in its place.

Okay, we now return to the house blog.

The siding project has been going on steadily.  We decided, even though we have all those fancy tools, that hand scraping the clapboards is the way to go.  I spray it down with the hose, then scrape, in an attempt to keep the lead dust at bay.  

Why, you ask did we decide to scrape by hand? The paint failure on the clapboard was significant, meaning on most parts with a little muscle, the paint kind of flies off (goggles are a must).  The Paint Shaver, though integral to the trim, seemed like overkill for the siding itself.  About 2/3 of the house is scraped, and Kevin is much further along on the beadboard soffits. This photo was taken before we began work on Saturday.  I would go out and take one now, but it is dark and it would be hard to see.  Picture most of the gray paint and most of the white paint gone and you'll get the idea.  We plan on this being our last paint scraping weekend.  Funny enough, we've had people lining up to help paint, but no one wanted to help scrape.  I feel like the Little Red Hen. 
Last, I give you a helpful tip we've discovered: 

This is our tool basket.  Everything for the project (that doesn't have its own case) goes into the basket.  I have yet to go hunting for a tool during the project, and carting things in and out is a breeze.  

Monday, May 25, 2009

A Quick Update

We spent the weekend stripping paint off the trim on the house. We are actually pretty close to a point where we will be able to start fixing stuff and priming. Maybe another weekend worth of work paint removal. I would post pictures but the battery on the camera is dead and I am too tired to charge it and take pictures. Sad.

Our neighbors are having very different reactions to this project. The ones closest to the side we are doing are thrilled, which is good because the paint shaver is not a quiet tool. They really like the look of the house and are excited about seeing it brought back to it's glorious little bungalow state.

Our neighbor on the other side laughed at us when we told her what we are doing. Not a mean laugh, more of a laugh of disbelief. Both of our current project and our project output in general. She said we are making her feel lazy. I think we are getting a reputation....

Monday, May 18, 2009

Hello Bungalow!

So we got carried away yesterday.... and turned our house into a bungalow. Just to give you an idea (lucky we did the fence project or we would have no before pictures of this side of the house) this is what we began with:I know it's not the best picture, but you get the idea. We lucked out (so far). There is not one clapboard that needs to be replaced. There are maybe ten shingles that need to be replaced due to splitting from nails. We LOVE it. I don't think I can even express how much I love the siding. The shingles have a docked corner where they meet the sofit. If you zoom in on this picture, you can see it.


This is not to say everything is perfect. We need to redo the corner trim. The skirt is missing some trim. Poor girl.
Also, the beadboard is giving us trouble. There are roofing nails sticking into it, so the heat gun, scrapers, and the new paint shaver are pretty useless. It is protected, so a lot of the paint is in good condition and won't come off. We are considering Peel Away. Anyone used this? Is it worth it? Any other ideas? Other than the beadboard, the rest of the project seems doable.

The old cement asbestos shingles are double bagged sitting in our garage. We wore respirators the whole time, and maybe cracked 10% of them, so safety-wise, I think we're doing pretty well.


And I LOVE it.

Saturday, May 16, 2009

Burning down the house....

Okay, so it just smoked a little. That's right, Kevin started the house on fire. Seriously, with the nice work on the fence and our finished bedroom, I was beginning to think we needed to change the name of the blog to reflect our mad skills. But I was brought back down to Earth today.

We were maybe ten minutes into the project when Kevin, who was on the ladder tackling the beadboard with the heat gun calmly asked, "Sarah, would you get a spray bottle?" I was busy into my own work, and told him just a second, until he asked again, this time with a little more urgency. That's when I looked up.

A comic (if you weren't us) routine followed, including a mad dash for the hose, running over to the burning corner, realizing the water wasn't on, and finally spraying from all angles and getting everything wet in the process. In case you are wondering, everything is okay (I can't even see where it's burned), and we live two blocks from the fire department, so even if we tried we would have a hard time doing too much damage. Needless to say, Kevin has been working with the heat gun on a much lower setting.
This is a shot of Kevin's progress for the day. The very corner, in the upper left of the picture is the infamous burned area. See? You can't even tell. The black area closer to the house in the photo is not from us. Wood rot??
Here's my progress form the day. The window is pretty close to being done, and will probably be done tomorrow, after I make a run to my sister's new house (they bought a Victorian) to give her rhubarb and onions. Finally, here is a close-up of the clapboard we stripped. It looks like it's in great shape, no?

Saturday, April 4, 2009

Yet another ridiculous project we are contemplating

This is the siding currently on our house (actually that's the garage, but you get the idea). It is known as cement-asbestos siding, and was used extensively in the 40s to 70s. It is kind of like an old version of Hardyplank, fake wood grain and all. It isn't bad, but it's not in character with the period of the house and, well, a little too frilly for my taste. As part of Kevin's birthday present, he was allowed to peak under the siding to see if the original clapboard was there and what the condition was like, as the current siding is more of an annoyance to him that it is to me.
It was there, and in pretty good condition. The paint was practically falling off. There were a lot of nail holes, but the wood looked good.

We HAVE to paint the trim this year, as it should have been done about five years ago. Theoretically, it would be a good time to do the siding removal. I say theoretically, because, a project like this comes with some risks. Following is a list of pros and cons to this project. I have included a poll on the side bar, and I encourage all to vote. Also, if you have experience with a project like this, or a strong opinion, please leave a comment.


PROS:

1. The clapboard would be so pretty. See, here's Tom Silva from This Old House installing some:

2. I could paint the house the colors I want.
3. It would not be blah and white.
4. There is very little risk in handling asbestos siding as it is only about 5% asbestos, and that is embedded in concrete.
5. My parents own a truck and are gone frequently in the summer....what do you say, Dad?
6. The house would be back to its bungle-splendor on the outside.
7. We could buy this nifty tool:


8. We have nothing better to do.
9. It would not be blah and white and frilly.


CONS:

1. The condition of the original siding is really unknown, but the stuff we found underneath seems like it's in good shape. (People generally installed it for the same reasons they install vinyl siding today: a salesman came to the door and told them it was maintenance-free; not because the siding was falling off the house)
2. It could get expensive if the condition of the siding is in bad shape.
3. The top of the house might be clad in cedar shingles, but for complicated reasons involving a scary wooden ladder that came with the house, we haven't checked yet. That could also get expensive.
4. Asbestos will be annoying to deal with: we would have to wear respirators and be very gentle with it, as it is only dangerous when broken.
5. It could be a lot of work (though see PRO reason #8)

Thursday, March 26, 2009

Stripping doors

Kevin, here. My fine partner asked me to write up a "how-to" on stripping a door so here it goes. I must warn you, I am not nearly the writer she is. Her writing is clear, funny and quirky, my writing is none of those things.

So I went through several different paths to strip the doors. It seems the best approach is a combination of several stripping techniques. This is because there are so many elements to a frame and panel door. Also, there are lots of cracks and crevices and if you are like me it is just not worth doing if you leave a speck of paint. This mentality drove my dear partner out of her mind as she watched me spend hours with the dental pick going after paint specks.

This is roughly the the process we used to restore the doors.

1. My lovely partner used the heat gun (thanks Jim) to strip the majority of the paint off of the door. As always, this worked best on the flat surfaces and left a lot of paint in the curved surfaces.
2. On the first door, not thinking about logical sequences, I then went straight to using some medium steel wool and denatured alcohol to remove the remaining paint on the flat surfaces. I did not want to have to sand the doors. You will understand why this was dumb as we go forward. The alcohol and steel wool works very well except for where the grain goes wild. You can see in this photo where the grain goes swirly right above the outline of the door plate. The paint embeds itself really well in that type of grain. It leaves behind a very light shellac finish that is still colored by just a little bit of the dark garnet shellac. So when it got too hard trying the get the paint out of that grain with the steel wool and alcohol I skipped to dealing with the paint wedged between the panel and the stiles.

3. You can see in the photo the white line where the vertical stile meets the panel. At first I tried picking out the paint with dental picks. This was slow and did not work well at all. I wanted to try this because I did not want to resort to stripper. In the end though, the only way to really get at this paint was with stripper. We had been using Citri Strip for the windows, but for this paint I decided it called for hardcore, super-toxic paint stripper to get into all out of the cracks. I got the sense that I might be going too far when I poured the stripper into a glass jar and the fumes coming out of the can looked like heat radiating off of a hot asphalt rode. I ignored this first warning sign. Then as I was starting to brush it on a drop fell on my wrist and I could have sworn my sweet partner was poking me with a cattle brand, again I ignored this warning. This stuff worked incredibly fast. In fact, it dissolved the paint into something resembling half and half. No big deal, I thought, I will just wipe it off and clean the remainder off with mineral spirits as the directions instructed. The mineral spirits did absolutely nothing. The stripper sort of adhered itself to the door. So I tried putting water on it, since it is the universal solvent. This turned it into hard little beads. Finally with enough scrubbing, water and cursing I got most of it off. From what I can tell this stuff is basically meant for flat surfaces where you can just scrape it off, but then why not just use the heat gun?

I went back to the Citri Strip and the 12-24 hour wait. The Citri Strip is actually really good for this type of stripping if there is shellac underneath the paint. I found a toothbrush and lots of time was the best approach for getting the paint out of those crevices. Then I just cleaned up with water. It is important to get the paint out of those edges, otherwise when the panels contracts there will still be paint on the farthest edge of the panel and I am pretty sure you would have white outlines around each panel.

4. As the door dried from its deep rinse, I noticed that the stripper had stripped a one inch border of the shellac residue left behind by the alcohol and steel wool treatment around each panel. This made all of that work a waste. I could never even this out with new shellac, so I ended up having to sand the whole door. This did solve the paint-in-the-swirly-grain problem though. In the process I killed my forgiving partner's favorite tool, her Makita random orbital sander. It doesn't orbit very well anymore.

5. The next problem I ran into was trying to remove 50 years of human hand oils from the top right corner of the door. This hand oil had congealed into the most impossible to remove goop I have encountered. If I tried to sand it, it just clogged the sand paper. It was impervious to heat and the stripper did nothing. I finally resorted to paint scraper. It works as long as the blade is sharp.


6. This led me to using my cabinet scrapers to clean up the contours of the panel frames and in generally using the scrapers to prep the door before starting to apply finish. They leave a nice almost iridescent look to the wood. Just make sure you figure out how to sharpen them; otherwise they are next to useless.

7. Then I got out dental picks and got to work on every corner of the panels and the joints where the rails meet the stiles of the doors. It is worth it, really.

8. We installed the newly stripped hardware and mounted the doors in the frame. We applied the shellac to the doors once they were mounted so we could do all the sides at one time.

9. I then took a step back, cracked the top off that can of hardcore paint stripper and marveled in the restored door.

Once I had the process down, the other three sides of the doors went fairly quickly. I could get a whole door stripped and sanded in a weekend. This is probably the reason why professionals can work so much faster and get better results; they know what works and in what order to do it. The only remaining item left for the doors is rubbing out the finish. I would like to do this so the sheen is even across the whole door and the get rid of some of the imperfections in the door. Sarah won't let me and since I have never done it and cannot make a convincing case. So I leave it to the readers to write in and convince her to let me try.

Monday, March 23, 2009

Ta-Daaa!!!!

The room is done! And now, for your enjoyment, some housey goodness....
This is the two doors, on the left, the main door, on the right the closet.
With the doors closed. This one also shows my mad skills with a miter saw. The quarter-round was not original anyway, and we make it a rule to only strip original. So we bought new. And I sawed it.This is actually our bedroom, but it is a good representation of what the woodwork looked like before.
This is the closet before...

and the closet after.
And finally, some good old before photos. The day we purchased the house:When my sister lived with us about this time last year. Betcha would have made your bed if you'd known this would be blogged, huh, Chris?After, now our TV room. The yello above is more like the actual color. It's not as yellow in real life.

Monday, February 23, 2009

We're SOOOOO close!

The room is sooo close to being finished! We have been working very hard on it over the weekends, and the blog has suffered. I am going to get back on track, I promise. I have also been spending a lot of time doing work from home for school. What's worse is, on February 14, it was our one year anniversary of owning the house! And I didn't even blog about it! Poor house. However, we did work on the house that day. Then we cleaned up, got dressed up, and walked to dinner at a neighborhood restaraunt. It was a pleasant housiversary and Valentine's day.

Especially considering last year we ripped out carpet and ordered a pizza.

Wednesday, November 26, 2008

Is it weird...

That I really enjoy stripping paint? I mean, don't get me wrong, the dangerous lead issue is no fun. However, watching the paint bubble up, and then scrapping it off in ugly, lead infested ribbons makes up for the hassle. It's a little like Christmas: what is the grain going to look like under here? Oh! I think there's a knot coming up! Look at that tight, old-growth grain! Wow!

Kevin and I have been taking the lead thing seriously lately. Me, because I would like us to be able to reproduce someday (not any time soon, mom), and Kevin, though he wouldn't admit it, probably has the same thought. Also, the other things lead paint does to you aren't pretty.

For this project, as prep, I laid down cardboard, brought up the saw horses, the shop-vac (it's like our second pet, it goes everywhere with us), respirators, all of the tools I could think I would possibly need, and a fresh set of work clothes. This is a big part of lead prep. Once I seal myself in, I don't like to leave. This is what I did for this room:
I used duct tape (none of the door frame wood work has been stripped, so I don't care about wrecking anything) to seal the door way on the top and right side. Then I used tape rolls on the left to make an opening. The plastic also overlaps the doorway. On the floor, I tape about half-way, then use a cardboard box to weight it down. It's not a perfect seal, but after working, when I leave the room, I can't smell burning paint fumes, so it must work.

We keep our work clothes in the room for the duration of the project. We take off whatever we're wearing and leave it outside the door, then go in and put on work clothes. And of course, like all the cool people, we both always wear our nifty respirators. The other thing we do is use the shop vac periodically as we're working to get all the chips we can up as we go, so there's less chance of stepping on them and crushing them.

This is the heat gun we use. It is on loan from Kevin's uncle, Jim. Thanks again, Jim! It has variable heat settings that are really useful. It tells you the temperature it's set at. Which is especially good if you know that lead fumes vaporize at 1100 degrees. It also blows at high and low speeds. It's a Wagner, but we haven't seen one like it at any of the hardware stores we frequent, though we forgot to check Seven Corners last weekend (I just looked in the catalog, and they have similar models). We love it, and it's been put to good use.

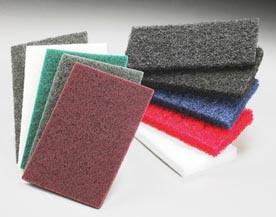
Basically, our process is this: I strip a section with the heat gun. Kevin comes behind me and uses 0000 steel wool and denatured alcohol to get up any bits the heat gun missed and to take the old shellac off. This is what it looks like after I run over it with the heat gun: That is the closet door, and no, I'm not leaving the panel like that, I was just doing the easy flat surfaces first. Anyway, see the bits of paint? Now Kevin comes along this is what the wood looks like after he is finished:
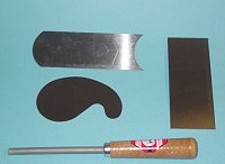
Pretty, huh? It's pine, really nice old growth. This is a shot of the profile of the two pieces of molding, yet to be stripped. There's also quarter round. You can see how they fit together if you look at the shot above. There's about three layers of paint, and one swipe with the heat gun (if you're as good as me) usually takes it right off. It helps the wood has shellac on it underneath the paint.
We are kind of trying two methods with this room. Half of the molding was taken off for the electrical project, so some of it we are stripping in place and the other half we're using the horses for. Believe it or not, I think it is more comfortable to work on the molding in place. We pry it slightly away from the wall so we can get the edge really clean, but we don't risk cracking the molding.
Also, when it's on the wall, I don't bump my head on the slanted walls as much.

Saturday, September 20, 2008

Window After Pictures

We had a bit of a camera dilemma so pictures were sparse for awhile, but I went back to the last two posts and added some pictures, so if you read them already, go back to see pictures of our yard and the window in progress.

Here's where we're at on the project that was supposed to take a few weeks back in May.

Living room:
Done!

Foyer still needs:
Shellac
Spring Bronze
Paint
Sash cord
Parting Bead
Hardware installed on sashes

Dining Room still needs:
Stripping
Sashes painted
Glazing to cure
And everything still needed on the foyer

To make us feel better, I am ending this post with after pictures of the living room window.


This is the screen that we bought at Bauer Bros. The paint was chipping and its mortise and tenon joint was pulling apart. I spent a lot of time fixing it up: stripping paint, gluing, etc. We bought new screen and I tacked it in with galvanized nails, which I think looks pretty sweet. You can see them in the detail shot below. You can also see the house is in great need of a paint job.
These are of the actual window. This is the same window, one picture had flash, the other didn't. I would say the brighter one is a little more realistic in color. Like I said, we used stain and spar varnish on the sashes. On the interior trim, we used garnet shellac. I think it turned out beautifully, but we both agreed that for the other windows, we're going to cheat and stain first, rather than try to use shellac to match the finish. It took a ton of coats, and shellac dries so quickly it's a pain to work with. I like the wood, white trim and blue screen. It looks very nautical to me.Finally, this is the hardware. I have a confession to make. I followed the advice of many online and boiled off the old paint on my hardware. We were confronted with pretty dull hardware that had a copper color to it, when it still had the finish on. Otherwise it was just raw steel. They are pitted, and are in need of a replating that is not in the realm of What-Sarah-and-Kevin-can-afford. So...I used Rub n' Buff. I coated it in clear spray on shellac. The other options: to try and find matching replacements at a salvage shop or to buy new at Home Depot were not appealing. First off, my tube of Rub n' Buff (in Autumn Gold, you can find it at your local arts and crafts store, come on, you know you want to...) was a couple of bucks. New hardware, or new-old hardware, would have been way more than that. Also, The new stuff looked so cheap, and even the quality at the salvage places didn't seem to match what we had. I think I chose right, do you?
I would like to find the oil-rubbed bronze Rub N' Buff color and put it over the coppery color I have on now, because it seems like that was the original finish on most stuff.