Kevin, here. My fine partner asked me to write up a "how-to" on stripping a door so here it goes. I must warn you, I am not nearly the writer she is. Her writing is clear, funny and quirky, my writing is none of those things.
So I went through several different paths to strip the doors. It seems the best approach is a combination of several stripping techniques. This is because there are so many elements to a frame and panel door. Also, there are lots of cracks and crevices and if you are like me it is just not worth doing if you leave a speck of paint. This mentality drove my dear partner out of her mind as she watched me spend hours with the dental pick going after paint specks.
This is roughly the the process we used to restore the doors.
1. My lovely partner used the heat gun (thanks Jim) to strip the majority of the paint off of the door. As always, this worked best on the flat surfaces and left a lot of paint in the curved surfaces.

2. On the first door, not thinking about logical sequences, I then went straight to using some medium steel wool and denatured alcohol to remove the remaining paint on the flat surfaces. I did not want to have to sand the doors. You will understand why this was dumb as we go forward. The alcohol and steel wool works very well except for where the grain goes wild. You can see in this photo where the grain goes swirly right above the outline of the door plate. The paint embeds itself really well in that type of grain. It leaves behind a very light shellac finish that is still colored by just a little bit of the dark garnet shellac. So when it got too hard trying the get the paint out of that grain with the steel wool and alcohol I skipped to dealing with the paint wedged between the panel and the stiles.
3. You can see in the photo the white line where the vertical stile meets the panel. At first I tried picking out the paint with dental picks. This was slow and did not work well at all. I wanted to try this because I did not want to resort to stripper. In the end though, the only way to really get at this paint was with stripper. We had been using Citri Strip for the windows, but for this paint I decided it called for hardcore, super-toxic paint stripper to get into all out of the cracks. I got the sense that I might be going too far when I poured the stripper into a glass jar and the fumes coming out of the can looked like heat radiating off of a hot asphalt rode. I ignored this first warning sign. Then as I was starting to brush it on a drop fell on my wrist and I could have sworn my sweet partner was poking me with a cattle brand, again I ignored this warning. This stuff worked incredibly fast. In fact, it dissolved the paint into something resembling half and half.
No big deal, I thought,
I will just wipe it off and clean the remainder off with mineral spirits as the directions instructed. The mineral spirits did absolutely nothing. The stripper sort of adhered itself to the door. So I tried putting water on it, since it is the universal solvent. This turned it into hard little beads. Finally with enough scrubbing, water and cursing I got most of it off. From what I can tell this stuff is basically meant for flat surfaces where you can just scrape it off, but then why not just use the heat gun?
I went back to the Citri Strip and the 12-24 hour wait. The Citri Strip is actually really good for this type of stripping if there is shellac underneath the paint. I found a toothbrush and lots of time was the best approach for getting the paint out of those crevices. Then I just cleaned up with water. It is important to get the paint out of those edges, otherwise when the panels contracts there will still be paint on the farthest edge of the panel and I am pretty sure you would have white outlines around each panel.
4. As the door dried from its deep rinse, I noticed that the stripper had stripped a one inch border of the shellac residue left behind by the alcohol and steel wool treatment around each panel. This made all of that work a waste. I could never even this out with new shellac, so I ended up having to sand the whole door. This did solve the paint-in-the-swirly-grain problem though. In the process I killed my forgiving partner's favorite tool, her Makita random orbital sander. It doesn't orbit very well anymore.
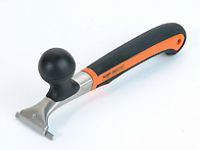
5. The next problem I ran into was trying to remove 50 years of human hand oils from the top right corner of the door. This hand oil had congealed into the most impossible to remove goop I have encountered. If I tried to sand it, it just clogged the sand paper. It was impervious to heat and the stripper did nothing. I finally resorted to paint scraper. It works as long as the blade is sharp.
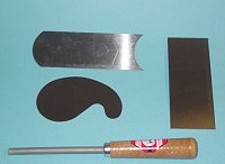
6. This led me to using my cabinet scrapers to clean up the contours of the panel frames and in generally using the scrapers to prep the door before starting to apply finish. They leave a nice almost iridescent look to the wood. Just make sure you figure out how to
sharpen them; otherwise they are next to useless.
7. Then I got out dental picks and got to work on every corner of the panels and the joints where the rails meet the stiles of the doors. It is worth it, really.
8. We installed the newly stripped hardware and mounted the doors in the frame. We applied the shellac to the doors once they were mounted so we could do all the sides at one time.
9. I then took a step back, cracked the top off that can of hardcore paint stripper and marveled in the restored door.
Once I had the process down, the other three sides of the doors went fairly quickly. I could get a whole door stripped and sanded in a weekend. This is probably the reason why professionals can work so much faster and get better results; they know what works and in what order to do it. The only remaining item left for the doors is rubbing out the finish. I would like to do this so the sheen is even across the whole door and the get rid of some of the imperfections in the door. Sarah won't let me and since I have never done it and cannot make a convincing case. So I leave it to the readers to write in and convince her to let me try.


